This is about a desktop software and it might be strange to feature it as the second article of a so-called System Admin blog. But let’s be honest: who among us doesn’t use Excel on an extensive basis, to track down their jobs, and even sometimes as some sort of light database? We know there are more professional tools, but still, Excel has been forced into our Windows-corrupted minds as the spreadsheet tool, every Microsoft client has it, it works fine with SharePoint (yeah we have that in our company as well), so let’s skip the rhetoric and get to the point.
I want a whole line (technical name is “Row”, we’ll try to use it from now on) in a specific formatting (color, font, whatever) according to the content of one specific cell from it. Typically, I type “OK” in the cell C2, and I want the whole row (2) to be e.g. grayed out.
So let’s use a scenario to illustrate this: I’m moving servers from one monitoring infrastructure to another, and I want to keep track of which server has been actually migrated:
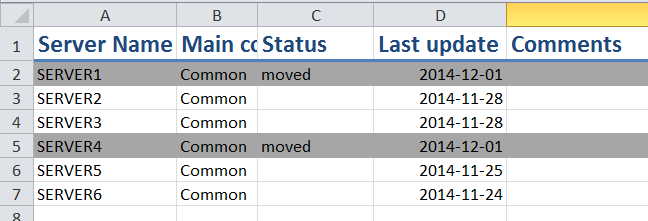
See? I type “moved” and the whole line gets grayed out.
Go to the Conditional Formatting Rules Manager : Home > Conditional Formatting > Manage Rules (path is in Excel 2010).
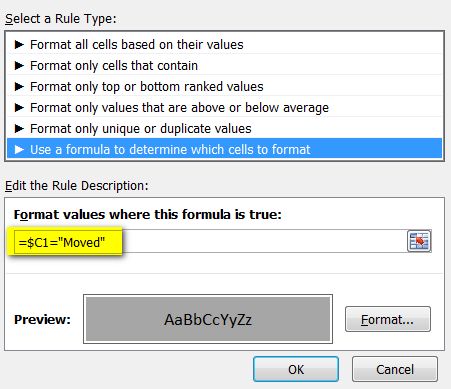
Click on the New Rule button > Use a formula to determine which cells to format:
Click the Format button and choose what kind of formatting you want. Here, I chose to fill the cells with dark gray color.
In the Formula field, enter the following:
=$X1=”TEXT”
With two “=” signs, yes, and where “X” is the column where you want to test the value, and TEXT the text you want to check. This is a logical test, if you know what it is, I don’t have to explain. If you don’t know, well I don’t want to explain, go read some.
Validate it and you are brought back to the Conditional Formatting Rules Manager where you see your rule, and you have to correct the “Applies To” field to the whole document.
(Technical Note: for ease’s sake, that’s why you use 1 as row in the formula above, you could select from a specific row but then you would have to use more complex ranges for the “Applies To” field here).
Easiest way: click on the little button next to the field and then in the upper left button (next to the A column) to select the whole document:
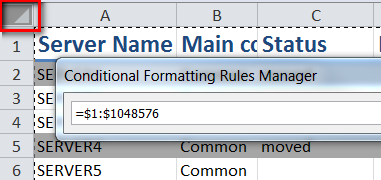
Or just write the “=$1:$1048576” formula in the field (yes, smartasses, you can apply this to any rows you want…). Let’s say we use this formula, which also explains why we used the first row ($X1) in the formula above: you want the value of the cell to impact the formatting on same line of data.
Now write your text in the corresponding cell. For the example here “moved” (or “Moved”; this is Windows, not case sensitive), and bam, the whole line gets greyed.
Now this is nice, don’t you think? Well, don’t be happy too soon. Cause if you manipulate your cells with actions that impact style (cut-paste with style, row insertions, etc.) the “Applies To” might get severely screwed:
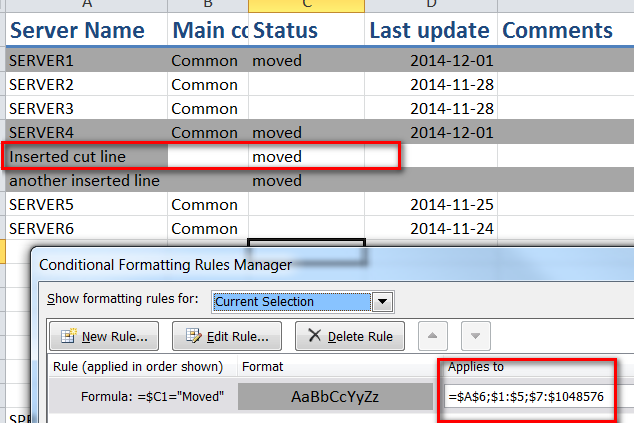
And this is just after two cut-pastes and two insertions.
As usual, Microsoft Office products managing styles & layout for you; be prepared to correct this.
In short, when you got something weird with your conditional formatting, just review the Rules Manager, be sure to select “Show formatting rules for: This Worksheet” (unlike in the last screenshot above…), erase all the crap in the “Applies To” field and enter the magic formula for the whole document again (=$1:$1048576) or just click the button left to the A column, like explained above.
This will clear the mess. And to (try and) avoid these kind of stuff, in a document with lots of formatting like this, think about copy-pasting VALUES from the cells, instead of the cells themselves.