Windows: how to delete repeating “infinite” nested folder structure

This can happen with a lot of different programs, or even with messing up a script or something: some loop happened at some point when copying/creating files on a disk, and you get a repeated folder structure clogging your storage.

I’ve had the issue with Robocopy, a vintage (1996!) .exe perfect for scripted simple file backups. Hey, the latest release is from 2019 after all 🙂

I used it to copy some user’s AppData in Windows 10, to another disk. The process took ages, which seemed weird to begin with, as the user’s AppData was about a few GB’s.

The command with parameters I used was the following:

The command ran for more than an hour, and then seemed to be stopped. Yeah, the mentioned F:\ disk was 100% full.

The result was pretty amazing. I solved the issue since I’ve had it so the screenshot below is made-up, but this is kinda faithful to the situation I had on the backup drive ( F: )

So the folder “Username” was containing its usual “Local”, “LocalLow” an “Roaming” directories, plus their orresponding files. But inside the “Local” directory, you have the whole AppData with its three sub-folders and all files again, recursively, and bearing the full name “Application Data”.
I think it went to about ~20 levels of depth, until the disk was full. I don’t understand how this happened, probably some bug with Robocopy unable to process the users directories correctly in Windows 10.

I wanted to delete the root folder “Username” to clean all that crap, and it was plainly impossible: Windows was getting lost in the depth, with long files, and ACLs (maybe that /copyall option on Robocopy wasn’t such a good idea to begin with…)

I had to use two tricks:

First trick is to take ownership of the whole content of the folder, as far as the command could go:

To be executed in elevated cmd, and ensure your user is among the administrators of course. If needed, check the parameters of takeown.exe and adapt to your needs with your specific user.

Second one is courtesy of Blackbam’s (1), and is a pretty ingenious little batch file (in elevated cmd/PS as well):

So you rename your first looping sub-directory to “x”, you move the content of x’s subdir to the root (including the looping directory within), and delete x as well as its content. If you have a humongous depth level, you can even loop that into some PowerShell or batch if you remember that 😉

I had a little issue with rd unable to delete some long filename within a “Microsoft” directory, but once takeown had done its job and the folder moved to a higher level, the Windows Explorer was enough to perform the deletion… some tedious manual job but I hadn’t that many depth levels in the end..

And that’s it, I managed to free all the space eaten by this annoying situation.

Morality: don’t use Robocopy to backup user’s AppData! 🙂

Sources:

Azure AD: update CompanyName

In our Azure tenant, we have established naming conventions for O365 Groups, because we have a lot of users from different organizations federated in one single tenant, and we want to be able to sort out groups or it becomes total madness.

We have chosen the property CompanyName for this naming convention. From now on let’s call these organizations “companies”, it’ll be easier.

We have the usual 2 kind of users in our tenant: On one hand, the synchronized user from every company’s AD (recognizable with their UPN being firstname.name@thecompany.ext , and on the other hand, classical Cloud Identities directly created online (UPN is firstname.name@tenantname.onmicrosoft.com)

We have an AAD Connector which sync’s to Azure, users’ info from the source AD of every company, and within the numerous Connector Rules, we write for each company, the correct CompanyName (yes, it is hardcoded for each but we have about 20 companies so that is manageable).

But recently, in the context of PowerBI Pro, where in order to create App Workspaces you actually need to create an O365 Group, I have to give the Group Creator to Cloud ID’s who, not being part of any Company, had the CompanyName property to null, and thus couldn’t respect the naming convention, which blocked the group creation.

I just needed a way to update the CompanyName manually, and that’s another story.

I’ve tried the following:

  • Set-AzureADUser: you can update almost any property with this, BUT the CompanyName.
  • Set-MsolUser: plenty of other parameters to update, but still no CompanyName.
  • Found fancy solutions stating the Set-User cmdlet from Exchange (with the -Company argument) would somehow impact the CompanyName in Azure, but it didn’t appear to be true (at least for unsync’d Cloud IDs)

So, ticket to Microsoft, and some nice Tech Support guy first confirmed the attribute was read-only once in Azure and only writable through the Connector Rules, and I felt desperate because I didn’t feel like configuring Connector Rules for unsync’d objects.

Then a second miracle mail came, and Tech Support told me that very recently (February 2019), Microsoft Graph underwent some changes and that the CompanyName is now writable. Not wanting to dive into Graph, this led him to finally find the cmdlet to update the CompanyName!

TL;DR: Here is the command:

Works like a charm!

Just a little advise: you need WMF5+ for easy usage of the AzureAD module.

Sources:

ADFS: Claim rule to issue recursive group membership of a user

In the context of Active Directory Federation Services, the Relying Party Trust configuration implies Issuance Transform Rules, in which miscellaneous info is issued from a user to the application, most of the time the usual SAMAccountName, UPN, Name/Surname, Email Adresses etc.

We’ll consider here the case of a very specific request, but not that uncommon.

User X is a member of an AD Group called “Team_IT“, and this group is a member, among others, of groups “ADMGRP_MyApp” and “ADMGRP_AD“.   We want to issue this recursive membership (i.e. to ADMGRP’s) and, cherry on top, filter the issued group list because Team_IT group is a member of dozens of other groups and we only want the ones beginning with ADMGRP.

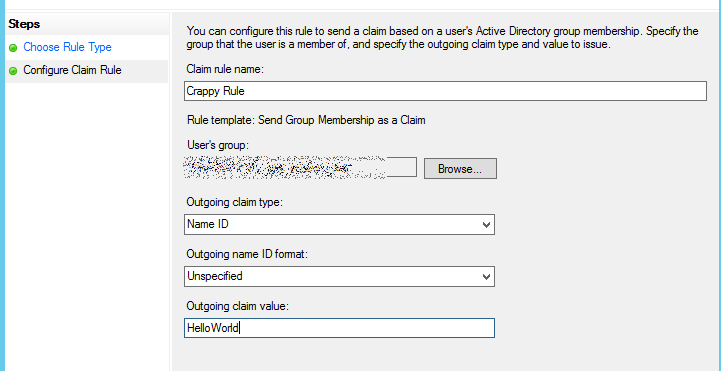
There is a direct way to send Group Membership as Claim but it’s kinda crappy. If I understood it well, it only allows you to check ONE group membership, and issue a custom value in the claim type of your choice.  e.g. User X is a member of group Teams_IT, then issue “HelloWorld” in claim type “Name ID”:

No recursive check, no multiple group check. Well you can make one rule per -hardcoded- group; hello flexibility! …

So we are left with custom rules, and we must dive into the fantastic world of ADFS Rule language.  I haven’t understood it all, but know these rules already:

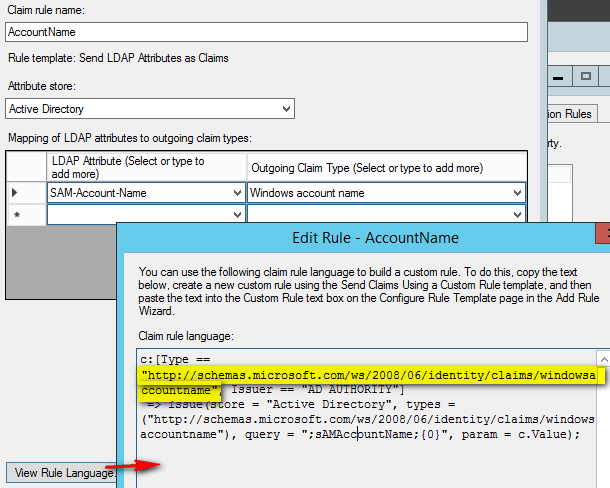
1. The claim type is *whatever you want*.  All drop-down menu entries giving you a claim type, translate this into a line of “rule language” with a link to a non-existent parameter definition.


This link http://schemas.microsoft.com/ws/2008/06/identity/claims/windowsaccountname doesn’t actually exist (well, OK, not a 404 because the site itself exists but hey..). You could really give any reference there. But of course when using the claims, you have to give that precise reference.

2. If you use a custom LDAP query, it must be in the form

QUERY = “<QUERY_FILTER>;<ATTRIBUTES>;<DOMAIN_NAME>\<USERNAME>”

where the query filter is not mandatory (default value is current samaccountname); the attributes are those returned and the username is the one used to read the AD (pretty much any authenticated user can).

I quickly found how to return the attribute “memberOf”, but as you may well know this attribute only contains the direct group membership.

There is also a mysterious filter called LDAP_MATCHING_RULE_IN_CHAIN but which only works on a DN (DistinguishedName) object, which is not a value often used in our ADFS context.

So in short we’ll have to create 3 rules to achieve what we want.

In your ADFS rule add wizard : choose “Send Claims as Custom Rule” in the dropdown menu, and be sure to give them this order (rules are processed chronologically):

1. Store the username as distinguishedName (DN)

We store the SAMAccountName into a custom claim type that I named “nameDN” (I totally made up the link from the common “name” type).  Note the query like explained above, which has an empty first parameter (thus the default SAMAccountName, that we want), takes its attribute distinguishedName, and then uses the same Samaccountname again to access AD.

2. Store all group membership recursively, using the syntax with the DN

This is tricky. the chain of numbers is the LDAP_MATCHING_RULE_IN_CHAIN mentioned above. We use 2 parameters also, one still being the SAMAccountname and the other being the custom type DN that we made on the previous rule.
The claims/group is also made up, from the one I found in the example for the next  rule.

3. Issue the filtered list of group following our needs

Using the made up Group type claim, and filtering its name to begin with ADMGRP.

There, both ADMGRP_* groups are correctly issued!

Rule syntax is a merge from MSFT Pierre Audonnet (merci !) and various users on Technet (thanks!)

All sources:

https://docs.microsoft.com/en-us/windows-server/identity/ad-fs/operations/create-a-rule-to-send-group-membership-as-a-claim
https://social.technet.microsoft.com/wiki/contents/articles/8008.ad-fs-2-0-selectively-send-group-membership-s-as-a-claim.aspx
https://social.technet.microsoft.com/Forums/ie/en-US/f238d2b0-a1d7-48e8-8a60-542e7ccfa2e8/recursive-retrieval-of-all-ad-group-memberships-of-a-user?forum=ITCG
https://blogs.msdn.microsoft.com/pinch-perfect/2015/09/14/querying-attributes-from-active-directory-using-adfs-with-a-3rd-party-identity-provider/
https://docs.microsoft.com/en-us/previous-versions/windows/it-pro/windows-server-2008-R2-and-2008/ff608234(v=ws.10)#code-snippet-5
https://social.technet.microsoft.com/Forums/lync/en-US/ca566e15-4b3b-4830-ae65-e25d83251c07/adfs-claim-to-flatten-groups-and-return-full-dn?forum=winserverDS

SharePoint 2010 & OneNote 2010 – synchronization issues

OneNote is a tool from Microsoft Office to quickly write things down, such as meeting or course notes.  When put on a SharePoint collaboration space, it allows easy multi editing; we tend to use it quite a lot at work as it’s handy and quite powerful.

In order to avoid having peoplemixing up content, I usually advise people not to write in the same paragraph together, or better, not in the same text box.  If you are on the same page and want to edit things together with someone, use a different text box – sometimes it requires you to click way off or below the current text in order to create a new box.

That being said, and even if you’re the only one editing a OneNote file, at some point you might have synchronization errors.

You probably know that you cannot create a OneNote file on a document library requiring checkout:

But thing is, nothing prevents you from putting it in a library with versioning enabled, and that is a very bad idea, as we will see here.

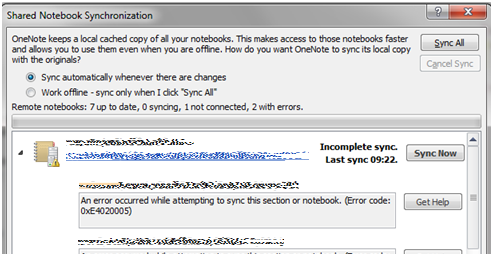
At some point, when trying to add a page or to modify anything to a page in a section, you will have the dreaded synchronization error message:
An error occurred while attempting to sync this section or notebook. (Error code:0xE4020005)

And then it’s getting like really annoying. Whatever you do to that OneNote file, be it with the web or the thick client, the targeted section(s) are impossible to modify in any way. Well you can modify them of course but nothing get saved.

An interesting thing to check is to see if the section is checked out to someone (in case the versioning is enabled on the library which, I remind you, is a bad idea for OneNote).

In order to do that:

  • Surf to the document library containing the OneNote file.
  • Modify the current view to include a Checked Out To column
  • Surf to the OneNote folder contents.  The default behavior when clicking on a OneNote document (represented as a folder in SharePoint) is to open the OneNote web tool. In order to work around this, do the following:
    • Well do that and open the OneNote in the browser and copy the part of the URL after “id=”, i.e. http://yoursite.ext/path/sitecoll/_layouts/OneNote.aspx?id=/pathandfilename&Source=parentpath&DefaultItemOpen=1
    • Go to the parent library containing the OneNote (URL with AllItems.aspx at the end) and manually add ?Rootfolder= followed by pasting the part of the URL you just copied at the previous step.   Final URL should be something like http://yoursite.ext/path/sitecoll/library/Forms/AllItems.aspx?Rootfolder=/pathandfilename&Source=parentpath&DefaultItemOpen=1
  • Browsing the OneNote content in that folder view might make you notice some pages and sections which are actually checked out:
  • You can then easily either discard checkout of the corrupted section(s).
  • If the corrupted sections unable to be sync’d, are not checked out, you can also try a checkout yourself, and then immediately re-checkin under a Major version.

When everything is clean, think about disabling the versioning on the document library containing the OneNote, and such problem would normally not happen anymore.

Last resort if the section still doesn’t want to sync, is create a new one and move all the pages from the old to the new… crappy work-around but it ended up working for a few desperate OneNote files here…


SharePoint: move a document library with Export-SPWeb

For some laziness reasons, and mainly because I had so many issues (or fear of issues, you know how that is) with the PowerShell commands to manage site collections, I got used to stsadm command line, which is something from SharePoint 2007 a.k.a. MOSS.

It still works with SharePoint 2010, and also in SharePoint 2013 with some workaround. But clearly, the SharePoint Management Shell is the way to go now, and I have been advocating Powershell for long enough, to go and try to make the effort to use it here.

I got a request from a user, to move a document library with versioning enabled, from a site collection root to a subsite, while keeping the whole version history of all documents within.

Opening the document libraries (source & target) with Explorer and copy-pasting works and even keeps version history, but only within the same site collection. Moving documents this way to a subsite, removes the whole shebang.   So yeah, it seems like we’ll have to use the dreaded Export-SPWeb command.

“Dreaded”, because the official documentation about it is poor, lowly documented and examples are just not complete, and you WILL get errors hardly understandable.
Blogger Blksthl provides a more documented version, but it still lacks to explain about this thing we use at work: managed paths. Even if in the URL nothing makes the difference, Managed Paths are not the same as site collections; they are a “sub-division of a web application”, and clearly they behave differently.

Logging on the App server with Farm Account (not sure such an elevation is needed, but I want to avoid permissions issues).  The aim is to migrate the document library MyDocLib from the site collection http://webapp.mysite.be/managedpath1/MySiteColl, to the sub-site http://webapp.mysite.be/managedpath1/MySiteColl/MySubSite/, keeping all versions of all documents – and user security, of course.

Now let’s try various versions of the syntax, since it’s never indicated where to put the managed path:

Oh yeah, even the value for parameter -Includeversions is not even well documented in the official doc. They mention 4 possible values but not exactly what to enter for each of them. I had to get more info on this on another TechNet article

The error message changes a bit, and it’s funny that it mentions the usage of stsadm.exe in the PowerShell command itself…

After some research, it might appear that the -itemurl parameter might require a full path, let’s try:

For some reason I didn’t include MydocLib in that command, and I don’t know if the result would be the same if I had. Anyway, you’ll find a lot of literature about this <nativehr>0x80070057</nativehr> error, but nothing I could get much from.

Ok enough playing, here is the way to success.

The problem is to know exactly what to put in –identity and -itemurl. For the first one, it looks like the full site collection path where the doc lib is located, is correct. For the second one, it’s another story, and thanks to TechNet user HAZET in yet another post on the problem, here is the SharePoint shell command to know about your site collection elements’ itemURLs:

The result will be something like:

Okayyyyy so the Managed Path has to be indicated in the -itemURL. So here’s the final -and working- command:

-identity: full site collection path
-itemurl: document library path with managed path and a starting slash.

Now you have your .cmp file ready to be imported in the target sub-site. The Import-SpWeb command doesn’t need an -itemurl parameter so you might think your problems are over .. but not quite yet:

The prompt is the correct directory, the file with this precise name exists.  OK this is PowerShell so maybe  .\MyDocLib.cmp ?  Nah, same error message.

In fact… Export-SPWeb can work in the current directoty, but Import-SPWeb cannot (if anyone finds any logic in this, let me know). You need to specify the full path:

It works!

IP addresses – don’t use leading 0’s!

First thing you might wonder with the title of this article, is why the heck would you write leading 0’s in IP addresses? Well, fair enough. But read on about this little story of mine.

We have Excel sheets here listing all fixed IP addresses from our networks, to know which servers have them, and for which reason.

For a reason unbeknownst to me, we have put leading 0‘s in the addresses in those sheets. Well, thinking of it, maybe it was for cosmetic reasons or easier column sorting, but in that type of document we could have simply typed the IPs from a VLAN in a certain sequence once and for all.

Anyway, so we have this Excel file with these addresses, and server names/comments I don’t copy here:

A good-willing Operator had to configure a new server, so he went to the Excel file, chose a free address in the list, which was

, and copy-pasted it to the deploy wizard.

Some time later (when the server was actually brought online), we got a reported IP conflict on the network, and nobody understood why.

So check this out, let’s ping the address of the new server:

IPoctal_01
I said 25 damnit, not 21 !

Yeah well, the .21 address was indeed already used. It turns out that using one leading zero in front of any IP chunk, will convert this chunk in octal (base-8).  So the address 192.168.147.001 is read correctly in decimal, but .025 means 25 in octal, thus 2×8^1+5×8^0  i.e. 21 in decimal.

So even if in some software the correction might be done, never ever write your IP addresses with leading zero’s.

Now let’s have some fun. You probably now that “0x” is the prefix for the hexadecimal notation right?

IPoctal_02
Every chunk can have its own radix.

Now WHY on earth you can do that, remains a mystery to me.

PowerShell one-liners: get DNS info

As you all Microsoft-sysadmins now know, PowerShell is t3H sh1T everybody is supposed to use, more and more.

Windows guys now have the ever-wanted ability to pipe stuff, we can execute commands in one line (also called “one-liners”), how wonderful  (you hear the sarcastic tone, I hope..).

Sometimes these commands are very easy, sometimes they’re a bit trickier, anyway I will record here some of the cool ones I met.

Last example in mind: a colleague asks me to provide him “a list in an usable text file, of the DNS info (static/dynamic record, record type) regarding Linux machines in our domain”.

We have a pretty complex naming convention here. All servers have a prefix of three letters followed by an hyphen, and then some random word to describe the server functionnality. Linux machines have prefixes all beginning with “L”  (how strange).  Problem is, laptops also begin with “L” (prefix “LP-“). Oh and we also have a few Linux servers with some specific random name as prefix (let’s call it “randomname” here).

Here’s the one-liner:

I love regexp’s as much as I suck at them, that’s why I’m so proud when I manage to get one to work for what I want! (one is happy with what one can..). So yeah in our example here, “randomname_2” is also taken into account.

This outputs a nice text file looking like the following:Powershell oneliner - DNS - output

where Timestamp=0 means static record, and the other fields are self-explanatory.

This must be executed on a server with the DNS Powershell cmdlets (easiest way : a DNS server..) and PowerShell version 4 or later (might work with v3, haven’t tested, but certainly doesn’t work with v2).

Exchange 2010: AD group for a Dynamic Distribution Group

I wanted to do something rather easy, or so I thought : use a Dynamic Distribution Group in Exchange, whose member(s) would be some Active Directory group(s).  In other words, I want an address mail in my company to send mails to one or many AD groups, but keep those AD groups as is because they have various purposes.

*edit* Following a colleague’s relevant remark: yes there is an easier way to mail-enable a security group but this offers less flexibility. In my case I initially wanted several AD groups to be members of that dynamic Distribution Group.  Plus, only Universal groups may be mail-enabled, so well, make your choice with the easy stuff or carry on with this reading.

For this kind of rather specific task , you usually take your favorite search engine, and after some digging among the usual crap on forums, you find your solution quite quickly. But this time it was a bit more tricky, so here’s the summary.

Note:  This is for Exchange 2010 and might be (very?) different in Exchange 2013 or later.

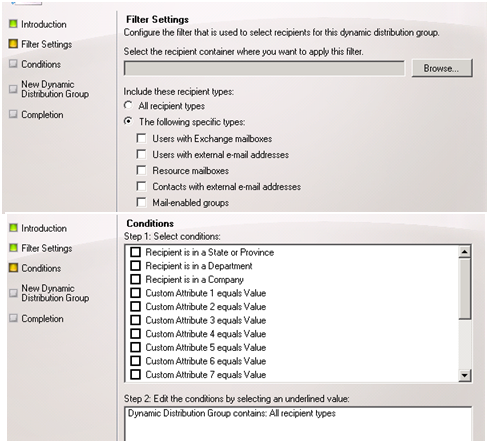
So you open your Exchange Management Console (EMC) and quickly notice that the options there are very limited:

ExchangeDDG_01_EMC
Container OU, recipient types, and 18 attributes (15 of which are Custom Attributes)…  sooo many options!
 

OK so, we’ve covered that many times, one magic solution for this kind of blocking issue : PowerShell.  Especially for Exchange where it gets heavily promoted.  You quickly find the cmdlet New-DynamicDistributionGroup and begin to read through the official documentation.  OK , at first glance, same options than in the GUI.  And anywhere you might search, it’s always about those damn few basic properties you can filter.

A deeper read into the last linked article brings out the “-Recipientfilter” param, which seems more promising. There, in the Advanced filterable properties you can find “memberofgroup“(LDAP name: memberOf“. Which one should I use, we’ll see that in a moment.  Time to build the PowerShell command!

I won’t go through every details of my tiresome quest, so please know the following badly or not documented points:

  • If you plan to use an AD group which contains only users with mails, you don’t have to specify any “type” of user of mailbox – most sites present this param as mandatory.
  • For Exchange 2010: the param to put the associated account into the desired OU is -OrganizationalUnit – with a “path string” (domain.ext/OU/OU2) value, not a X500 dir spec (CN=,OU=,etc.). It looks like this param has another name in other versions, check your documentation.
  • RecipientFilter  accepts a lot of values (see the linked doc above). For AD group it is memberofgroup with a X500 path (Distinguished name).  So yeah, in a single command, two parameters requiring different AD dir spec….

Here is my final command (use the Exchange Management Shell with appropriate credentials):

But it’s not over yet.

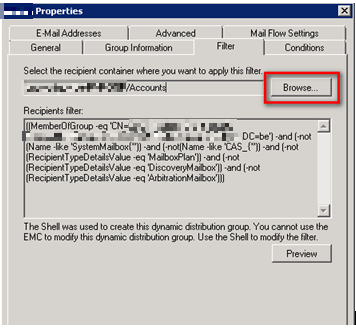
Back to your EMC, open this newly created group’s Properties and go to the Filter tab.  There you will see the filter-created-by-the-shell-you-cannot-modify-with-the-EMC” (with options I never specified, but hell..) and if you click the Preview button you will have … nothing.

The reason is: by default, the filter is applied on the same OU containing the Dynamic DG (or the AD group, cannot remember).
Change this container to the OU where the users are actually located! If they are located in many OUs, maybe at a “higher level”, but I haven’t tested this.

ExchangeDDG_02_PropertiesFilter
My sub-OU “Accounts”, located elsewhere, contains the users members of my AD group.
 

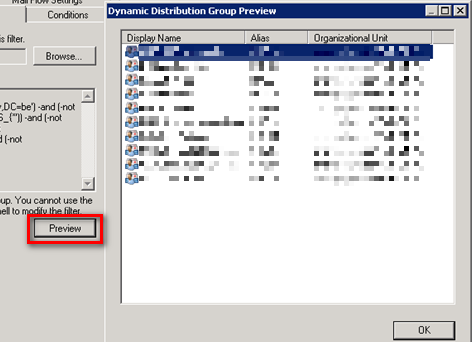
Then you can check the Preview button again and tadaaaa, the users are appearing.

ExchangeDDG_03_Preview
VoilĂ  !

Sources & additional info:

Remote desktop error on Windows 2012

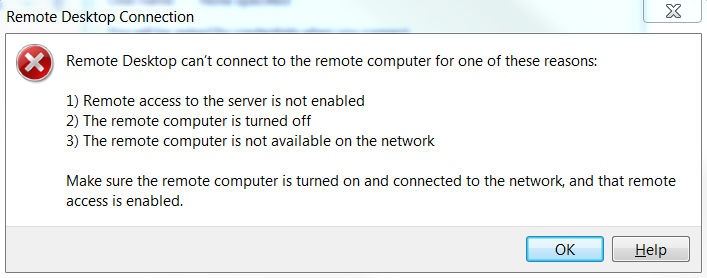
You want to connect with remote desktop to a fresh Windows 2012 server  (any edition) and you get the “Remote Desktop can’t connect to the remote computer for one of these reasons” generic message that isn’t giving anything except maybe a headache and the will to punch your screen:

Remote2012_00
For once, the Microsoft-style error message doesn’t totally lack of sense, especially about the last point: “is not available on the network”.

I don’t actually remember how it is with a Server 2008 out of the box, but I don’t remember having had those issues – then again, the guys at work making the templates for our virtual machines in 2008 had perhaps already fixed this…

Anyway, we’re talking here about Windows 2012 (“R1” or R2).

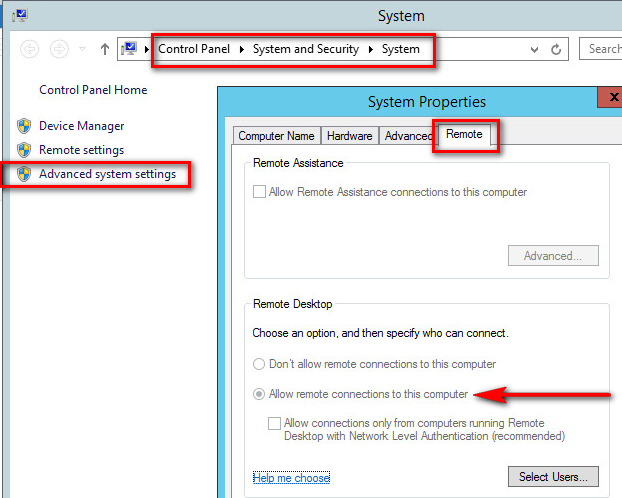
First things first, ensure the remote desktop is enabled.  Connect to your machine with the console (VMware/Hyper-V/whatever, or physically to the server if it is … a physical server)

Ensure the following is checked: Control Panel > System and Security > System > Advanced system settings > Remote > Allow remote connections to this computerRemote2012_01
This is greyed out here because we activate this through GPO.
Also, note that the checkbox below is NOT checked; this is to allow us to use software such as mRemoteNG (that I strongly advise). In a closed and secure environment, this is OK not to check.

So, Remote connections are allowed but you still get the error message, so there is a firewall issue as you may guess.

Of course you can totally turn the firewall off, but if you’re like me a bit, you don’t like opening all the doors of your home just because someone in your household hasn’t got the key to open one.

So let’s use cool powershell/prompt commands to solve this:

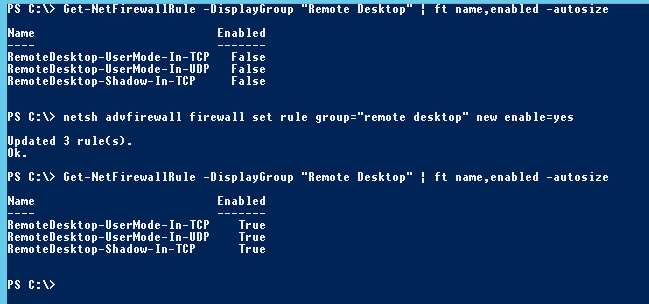
will output the three rules and their current Enabled status. You should see it to “False”

will open what needs to be opened.

will double check that everything is OK.

The global output should look like this:

Remote2012_02

Enjoy your remote connection!

Sources & additional info:


Excel: format a row according to the value of one cell

This is about a desktop software and it might be strange to feature it as the second article of a so-called System Admin blog.  But let’s be honest: who among us doesn’t use Excel on an extensive basis, to track down their jobs, and even sometimes as some sort of light database?   We know there are more professional tools, but still, Excel has been forced into our Windows-corrupted minds as the spreadsheet tool, every Microsoft client has it, it works fine with SharePoint (yeah we have that in our company as well), so let’s skip the rhetoric and get to the point.

I want a whole line (technical name is “Row”, we’ll try to use it from now on) in a specific formatting (color, font, whatever) according to the content of one specific cell from it.   Typically, I type “OK” in the cell C2, and I want the whole row (2) to be e.g. grayed out.

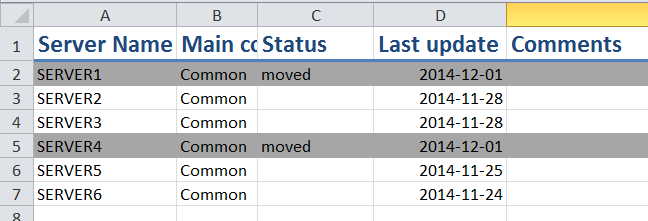
So let’s use a scenario to illustrate this: I’m moving servers from one monitoring infrastructure to another, and I want to keep track of which server has been actually migrated:

Excel-line-color-01
See? I type “moved” and the whole line gets grayed out.

Go to the Conditional Formatting Rules Manager :  Home > Conditional Formatting >  Manage Rules (path is in Excel 2010).

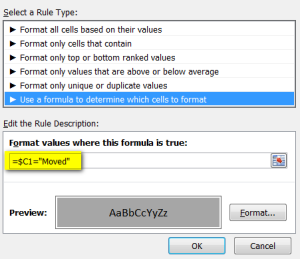
Click on the New Rule button > Use a formula to determine which cells to format:

Excel-line-color-02

Click the Format button and choose what kind of formatting you want. Here, I chose to fill the cells with dark gray color.

In the Formula field, enter the following:

=$X1=”TEXT”

With two “=” signs, yes, and where “X” is the column where you want to test the value, and TEXT the text you want to check.  This is a logical test, if you know what it is, I don’t have to explain. If you don’t know, well I don’t want to explain, go read some.

Validate it and you are brought back to the Conditional Formatting Rules Manager where you see your rule, and you have to correct the “Applies To” field to the whole document.

(Technical Note: for ease’s sake, that’s why you use 1 as row in the formula above, you could select from a specific row but then you would have to use more complex ranges for the “Applies To” field here).

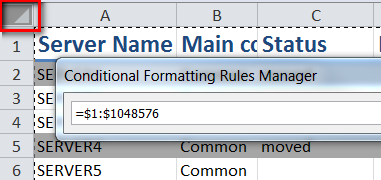
Easiest way: click on the little button next to the field and then in the upper left button (next to the A column) to select the whole document:

Excel-line-color-03

Or just write the “=$1:$1048576” formula in the field (yes, smartasses, you can apply this to any rows you want
).  Let’s say we use this formula, which also explains why we used the first row ($X1) in the formula above:  you want the value of the cell to impact the formatting on same line of data.

Now write your text in the corresponding cell. For the example here “moved” (or “Moved”; this is Windows, not case sensitive), and bam, the whole line gets greyed.
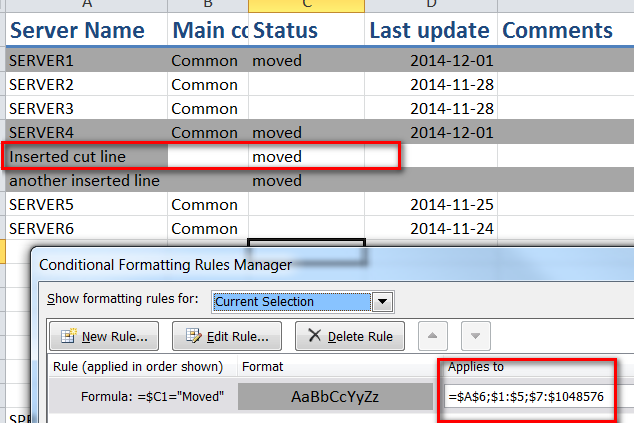
Now this is nice, don’t you think? Well, don’t be happy too soon. Cause if you manipulate your cells with actions that impact style (cut-paste with style, row insertions, etc.) the “Applies To” might get severely screwed:

Excel-line-color-04


And this is just after two cut-pastes and two insertions.

As usual, Microsoft Office products managing styles & layout for you; be prepared to correct this.

In short, when you got something weird with your conditional formatting, just review the Rules Manager, be sure to select “Show formatting rules for: This Worksheet” (unlike in the last screenshot above
), erase all the crap in the “Applies To” field and enter the magic formula for the whole document again  (=$1:$1048576) or just click the button left to the A column, like explained above.

This will clear the mess.   And to (try and) avoid these kind of stuff, in a document with lots of formatting like this, think about copy-pasting VALUES from the cells, instead of the cells themselves.